Category: Release Notes

Pro Online 2017: MN Validation Error (RESOLVED: ACTION REQUIRED)

01 Feb 18
Kim Manuel
,
No Comments

Resolved

The validation error has been resolved.  However, you will need to wait until we have enabled “Send State Only” to resend the returns that received this validation error if the Federal return has already been accepted.

How do I know which returns had the validation error?

They are listed on Reports>Validation Errors


~~~~~Original Blog Post~~~~~

Scenario:  You receive the following state validation error for MN:

This has been reported to our state development team Issue ID 872

Blog posted 01/29/2018

Alabama Reject Code: AL 40-915 series

31 Jan 18
Kim Manuel
, ,
No Comments

Scenario:  You selected No Drivers License or State ID from the drop down list and receive the following reject(s)

Reason:  Alabama requires a state ID for both the taxpayer and spouse.  They do not allow for no license or state ID

Solution:  If no information is available, the state will have to be filed paper


Pro Online 2017: Validation error for ZIPCd element is invalid (UPDATED 1:23 PM EST)

29 Jan 18
Kim Manuel
,
No Comments

Scenario:  You have transmitted returns and your status is remaining “Transmitted”

Navigate to Reports and run the “Validation Erros” Report to see if you are receiving the following error:

Note:  It will be the State abbreviations of your specific site.

Updated info: Next, navigate to the Configuration>>ERO Setup and verify that the zip code field for both have the zip code and not your state abbreviations. We automatically uploaded this information to correct the zip code in ERO setup at approximately 1:00 pm EST.

The zip code we entered was based on the order we received from the IRS.  Make the appropriate correction to the zip code field.

How to I send these returns after the correction to setup has been made?

Note:  You DO NOT have to open each return.

  1. Run the Validation Errors report first to identify the taxpayers
  2. Navigate to Transmissions
  3. Select Add Returns

4.  Select the returns that received the validation error (most likely all that are listed with the status of Transmitted)

5.  Once all the selections are made, click Add Returns

6. close the dialog box by selecting the X in the upper right corner

These returns are now available for you to resend.

Blog posted 01/29/2018

Pro Online 2017: Printing from Review Returns menu

27 Jan 18
Kim Manuel
,
No Comments

Scenario: Select a print set for a return from the Review Returns menu

Problem:  The PDF contains all forms, including the cover page, worksheets, etc.

Workaround:  Select a print set from the Client List or from inside the return

Solution:  We will fix this in a future update.

Note:  This only occurs when the print set is selected under Review Returns

Blog Posted 01/27/2018


MSA and Relational Sites: Security Template Information and Workaround

24 Jan 18
Kim Manuel
,
No Comments

We have identified a change in the behavior of assigning templates to the sites under your MSA and Relational groups from your group login.

Scenario:

Previously assigned user templates have changed for users at the site level.

Reason:

Assigning the Security Template from the group level is automatically changing the Security Template assigned to the users at the site level.

Identify if this happened

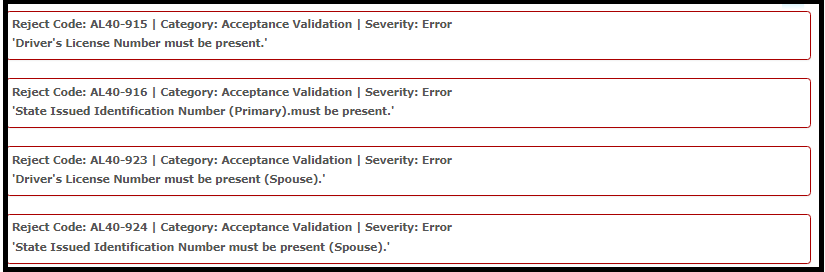
MSA groups — Each site can run the Username Report to verify the users assigned to each user at the site level.  This around the 4th column over.

Relational group — You can run the Username Report at the group level to see if anyone has been impacted.

We believe the sites impacted were assigned templates between Friday and today (Wednesday)

This does not impact other items that can be assigned.

We are actively working on a solution.  Until we have tested and delivered the solution you can do the following in order to get your security templates assigned at the site level (and not to change the template to all of the preparers at the site that have established templates)

Step 1:  Login as your MSA or Relational Group

Step 2:  Navigate to Security Templates

Step 3:  Select assign next to the Security Template

Step 4:  Place a check next to the site (if you are wanting to select all of your sites, you can use the Check/Uncheck All option)

Step 5:  Expand the list of users for the site(s)

Step 6:  Remove the checks from the boxes next to the users (DO NOT use Check/Uncheck All for this).  The example below shows that I have unchecked some preparers and not others.  In reality, I would remove the check from all users.

Step 7:  Complete Step 6 and select Continue

The following are examples of the two users that I have arrows next to above.  The screenshots are of the users from opening the Preparer(s) Menu at Kims Sample VITA/TCE Site

Example 1: Kims Site Admin with Blue Arrow where the assigned template DID NOT change because the check box was removed:

Example2 : Kim Richmond with Green Arrow where the assigned template DID  change because the check box was NOT removed:

Blog posted 01/24/2018   4:44 pm Eastern